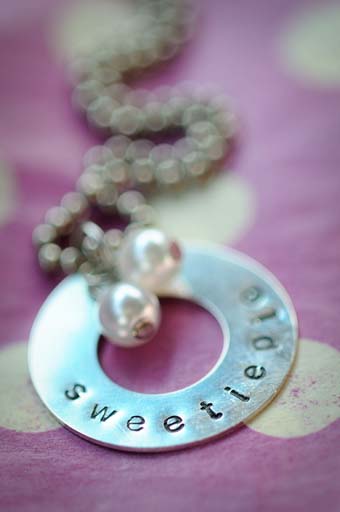
Thank you so much for all of my Valentine present love! You guys sure do know how to make a girl feel good. There were lots of questions about the little necklace for SweetiePie, so I thought I’d try to answer them. Please Note: This is NOT a tutorial. I feel you should know what you’re doing to offer a tutorial, and as you’ll soon see, I’m pretty clueless!
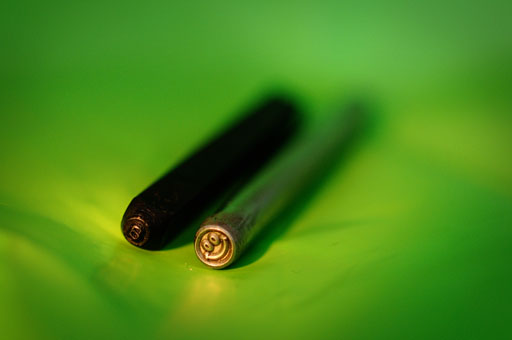
A few months ago, Beckie posted these cute little metal spoons and mentioned that metal alphabet stamps were available at Harbor Freight. That started me thinking about all the fun things that you can do with those stamps so I started searching online for a lower case set of stamps. So, first on your list of supplies, are these alphabet stamps.
When I first started searching I was only finding stamp sets for several hundred dollars (google it — you’ll see what I mean), but I kept searching and finally found this set of lowercase alphabet stamps for $18.00. That’s a huge price difference! I’m sure the more expensive sets will last longer, but since I’m not going into business or anything, even if I wear out a set or two, I’m still ahead of the game by buying the cheaper set.
I also found some really cute individual stamps at this etsy shop. (For some reason her shop is currently inactive — I hope she comes back up — there were some really cute stamps there.) I had to have the smiley face. These stamps are $10.00 each, and when pictured next to one of the alphabet stamps, you can see the difference in the metals. (Well, sort of — they’re pretty small and it’s hard to get a good picture.)
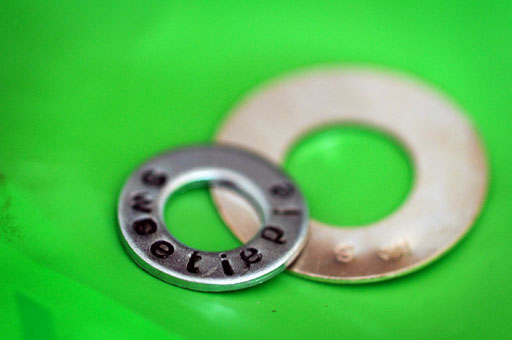
The other thing you need to make a SweetiePie necklace is a washer. You could use washers from the hardware store, but I wanted some sterling silver washers. I found some here, at Beaducation. I practiced on a little washer that I found in the garage. It went pretty well, but if you look very closely, you can see the outline of the stamp at the bottom edges of the i and the third e.
So, there’s no real technique to it (at least for me — I told you I don’t know what I was doing.) I found a patch of cement floor in the unfinished part of our basement, got down on my hands and knees (really, it wasn’t a pretty sight!) , put the washer on the floor and started placing those letters on the washer and smacking them a few times with a hammer. You do have to hold the letter very firmly. And if you remove it and didn’t hit it hard enough, oh well…too bad. It’s pretty much impossible to get the letter lined up again. (Thus the screwed up w on the sterling washer in the above picture.) I was asked how I held the washer in place — now there’s a novel concept — it didn’t even occur to me to do that. I have no idea how to keep it in place — duct tape maybe? Doesn’t that work for everything?
I’m happy to report I only screwed up two washers before I made the final version. That’s probably because I only had three washers. At $5.50 a pop, those were some expensive mistakes. (Perhaps that’s why these necklaces are so expensive to buy — to cover the cost of mistakes?) I’d really like to find some less expensive sterling washers, so if any of you find them, I hope you’ll let us all know. I might try working on hardware store washers again too — the sterling ones are nice to have though.
After stamping, I just took a permanent black marker and traced into the letters to darken them. Somewhere along the way, I read about some sort of chemical used to darken the letters, but I was in a hurry and didn’t want to mess with it. I’m sure the black in the lettering will probably wear off — if it does, we can always retrace it I guess.
As for the rest of the necklace, we have a fantastic little local bead store. When I was on my way out of town to see SweetiePie, I stopped there to grab some of their ball chain and see if they had any little pearl beads. They only had loose beads, but the lady there offered to put hooks on them for me — and she only charged me for the supplies. I was very impressed with their service. The beads are really easy to make — just string one bead on a wire and then make a loop at the top with some pliers.
Did I miss anything? I hope that was helpful. If you’ve done this stamping before and have anything to add, please chime in — I’m all ears!!!
XOXO,
Anna


Brilliant!! I have some stamps – now off to buy washers.
Hi! Great idea (thanks Kate, found via your tweet)! I found the etsy seller here http://makeitpersonaljewelrysupply.com
I love it. A friend of mine just bought the acid, the stamps, the pounding block, and rubber mallet. She checked out tutorials on doing it but couldn’t find a good source for the sterling silver. Thanks for the details you impressive girl you!
thank you for your UN tutorial.
i just need one.
her name is dollyhead.
thanks.
(it’s not really her name… and the morphing into that nickname is a long, boring story)
i don’t need it until next christmas.
i’m shopping early.
i’m brilliant that way.
thanks again!
I think you did very well for only three attempts ;). To blacken silver you need sulphur. Dilute it in hot water, immerse your silver piece and leave it until it’s quite black. Take it out and polish with silver polish until shiny; the lettering will stay black.
Thanks so much for the tips! That is one un-tutorial I need to try!
g’day Anna
I bought a necklace like this off the net.. if I had to make it, well lets just say i’d still be waiting! I am lazy you know.. I got the three ferals names on it, and red beads cause red was my late mums fave colour :O))
take care and enjoy your stamping!
Lissa
The necklace is gorgeous. Perhaps you can put the washer onto one of those nonslip cloths, it might work. I think it is a great idea using the black marker too to highlight the letters.
Un-tutorials are the best kind! Thanks for sharing, Anna.
I might have to investigate to see if they’ll post those stamps over the pond! Maybe I’d better hope they don’t! :oD
Hey? that Lisa wot posted a comment up there, do you think that is Lisa Leonard???
Really very clever!
Oh THANK YOU so much for this TUTORIAL (because it definitely IS a tutorial, Anna!) I definitely want to try this! Lucy xx
awesome…trully…I have always wondered how those were done.
What a gorgeous necklace. Simple, yet elegant, beautiful! I am sure she loves it!
Now I see why you didn’t need it clamped in place – you used sterling silver instead of just a cheapy washer from Home Depot! The silver is probably a little softer and so imprints easier. Harbor Freight might have to be a stop on my way home today!
You are soooo clever!
anna,
this is just great…great!!
i want to create napkin rings for a soon-to-be dinner party…& stamp different meaningful words that relate to friends…see what happens…
& thanks to nicole & her comment #2.
happy day to all!!
Great. Another craft I want to try. Can you lengthen the day by a couple of hours before you introduce me to something else??
This is awesome. I’ve been longing to know how these necklaces (bracelets and so on) are made. I did buy some from Etsy but want to try making my own. You’ve enlightened me and now I’m a woman on a shopping mission. Thanks!
So cool! I had no idea that this is how stamping was done. I want to try this… I wonder if I could sneak a new “craft” into my house without my hubby noticing and protesting! LOL
Jennifer :)
You made this look really easy! I love the look of these simple necklaces and your “sweetie pie” is cute.
A great untutorial. I am always amazed at the fantastic blogs you happen to know about that I’ve never heard of before. You are crafty-wise Anna!
Too darn cute! My nieces would love this!
Thank you Anna! That’s a great UN-tutorial and you’re making me want to make a few… dozen! LOL.
Not ready to purchase supplies yet but I’m putting them on my mental list to purchase!
Some great info! However, I’d probably be better off just buying one, too, otherwise it might never get done. It does seem like a very fun craft, though.
That was great, Anna. :o) I don’t know about the sterling washer being any better . . . it’s adorable, but I really like the thickness of the hardware store washer better than the slim profile of the sterling.
Now, since you’re on a washer kick, you need to make some fabric weights and then show us how to do it. :o)
Thanks for the info. I’ve got those supplies and should give it another go at making one. The last time I tried, I didn’t really love what I came up with. I like the permanent marker idea!
Thanks for the un-tutorial, Anna! I’m very curious about the handmade jewelery industry out there on etsy, etc–and you helped to answer some questions! Very nice job on the necklace. XO
Oh my gosh, Anna!! Adorable!! I want one!
I love Sweetie’s necklace and the boxer’s are darling. I adore gnomes, especially the travelling ones lol.xoxo
Well, as usual, you are a fount of information. Thanks for all the nitty gritty on this. I really like the looks of those jewelry items. Hmmmm…………
Thank you Anna, I would love to give this a try and now, thanks to you I think I can actually craft one of these sweet necklaces!!!
Thanks for sharing how you made that necklace. I had no idea how one would go about doing that, and didn’t realize you used a washer. Clever! It was interesting to read about the process. I have my doubts I could line up the letters as nicely as you did.
I’m impressed!
Very neat indeed!
How cute Anna! I don’t know how you find the time to do all these fun things!
cute Anna! I totally love it! Seriously, you have to be the most creative person I know!
So sweet…and this is one of the best “not a tutorial” tutorials!!! You are so creative!
so so cute Miss Anna:)
Wonderful! I’m off now to dismantle the washing machine in search for a washer…
How cool is that! Great job I say. I’m catching up on my blog reading, now I’m watching out for smiles. What a happy thing to do.
I’m glad you found a cheap source for the lowercase letters. The steel bench block really helps so you don’t have to use the cement floor. I actually saw them at a good bead store but was lucky that my husband had one already. And you’re right, masking tape is what I used to hold them down AND on a square ss tag it’s also great to help stamp a straight line. I actually bought a necklace from etsy for Cmas for my step-daughter because I didn’t have any lower case stamps. It was quite nice for anyone who doesn’t want to make them. (or invest in all the tools.) Tools… and collecting them – isn’t that half the fun of a new craft. The black marker works well…liver of sulphur is one stinky brew plus it makes the whole piece black then you have to polish. So many things to play with these days, so little time. Stay warm and Create. love, Robin
Anna – Hello! and nice to meet you. This is an awesome informational and inspirational post. I never considered making my own version of these lovley pendants … until now. Thank you so much. What a fun blog — I’m going to stroll around a bit more now.
You are too good Anna :) I love the necklace! The tutorial is great too. Easy & simple!
Hi Sweet Anna,
Just popping by to say hello, and see how things are in your world. You are always so good to visit, and leave comments, and I am so grateful (and a slacker for not visiting more).
Hope all is well for you!
Cherri
With 5 granddaughters these necklaces are MUST DOs! Thanks so much for sharing:)
That may not be an “official” tutorial in your mind, but that’s about all the encouragement I need.
Also, bless the Harbor Freight.
Thimbleanna, you are a WONDER and I am as ever dumbstruck at your ingenuity and general creativity.
Do you have a housemaid who does all the everyday stuff like washing the floors and ironing? (Or is that what you keep TheManOfTheHouse for…?)
This is so great!!!!!! I love it. I have seen such necklaces and have always admired them. The idea of making my own is tempting. You could write any words you wanted….hmm that could get me in trouble!! I guess spelling is important in these types of projects :)
Cool, what a fun project when you need to burn off frustration !!!! xoxoxo Clarice
Ooohhh you’re going to make me buy more stampy stuff…the cookie stamp has been very fun! O.k. off to shop :)
I think you should make these for a business! If you do, I’ll have to order one or two or so.
The stamps in themselves are cool to look at.
Jody
What a cool project, Anna! And ditto with Jody, I can see a business idea lurking there. I’d definitely be ordering if you’re making.
I always love your creativity and craftiness! :) I love the necklace and try to order one or a ring with my “one little word” each year. Happy stamping! ;)
I wish I had the time to even attempt to make one of these , they really are gorgeous … I think I’d put Milo and Gabes names on the front and hubs name on the back
This is great I would like to have that.
mr. melly will be thrilled when i tell him i actually want to go to harbor freight! -lol-
too, too cute, anna! i can’t wait to make one!
btw: any acrylic paint will work to fill in the letters too! color options are limitless!
I have a set of these punches too! I like to use them for clay projects… I never even ventured into washers before! So clever!
HUGS Anna!
It appears that that Etsy shop is open again :)
Uh oh. I was hoping you would tell us how you made it. I think I’ve developed another strong case of the I-wanna-try-thats! Unfortunately, I have zero time. Poo. Maybe someday soon.
Stunning…what a wonderful gift..so personal and perfect!