Thimbleanna

Happy July 4th!

Thimbleanna:  Happy 4th

Happy July 4th to all my US friends! And to all my UK friends, especially Pam — Happy Pam’s Birthday!!! Pam, I hope you’re celebrating your birthday the way we do — by grilling outside and watching fireworks! ;-D

TheFirstChild, SweetiePie and Winston are here and we’re having a nice quiet weekend. We’re planning a 4th of July bike ride downtown this morning and then we’ll have a little cookout with MeMum and BigDaddy here, at our house. Followed by some fireworks — TheManoftheHouse bought a few more than he should have this year — hopefully it will be fun AND mosquito free. (We’ve had such a wet year (the wettest June on record) and the mosquitos will eat you alive out there!)

I’ve managed a little sewing while the kids have been here. SweetiePie had some homework to do, so we sat together and I put a few stitches in another Chuck Nohara block. It’s slow going, but I have 5 little blocks now — this is going to be a loooong-term project!

Thimbleanna:  Chuck Nohara

The latest block, with the piggies, was a fair bit of work. I think it was meant to sew the little wedges onto a background fabric, but the piggies didn’t line up with the openings, so I cut them into hexagons and stitched them back together again.  Here’s a poor cell-phone picture taken before the wedges were sewn on.

Thimbleanna:  Chuck Nohara

I loved that I didn’t have to worry about my stitches showing on the seams, since they were covered up by the wedges. This was a really fun little block to make!

Thimbleanna:  Chuck Nohara

Ok — must run — lots to do today. If you’re partying in the US, have a great time!

XOXO,
Anna

Happy Summer!

Well, Happy Summer if you’re in the Northern Hemisphere.   And Happy I-hope-Winter-won’t-last-too-long to the rest of you. I can’t believe we’ve already had the longest day of the year for 2015. Time is flying.  As always. {Sigh.}

It’s been pretty busy around here. Nothing exciting — just the usual. I’m still weeding — I can’t seem to have all the beds weed-free at the same time. At the rate we’re going, it’s going to take until fall for me to get all the beds weeded. I’m blaming the rain. But it’s sure making things green and pretty, so I’m not complaining.

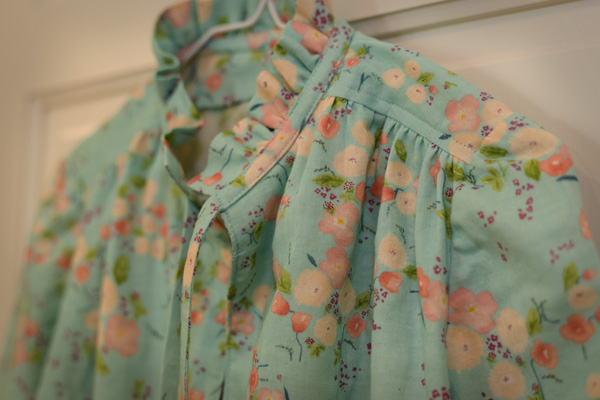
I also squeezed in a little sewing over the weekend. I’ve had this little shirt cut out since last summer and I finally managed to get it sewn together.

Thimbleanna:  Nani Iro Shirt

The fabric is a Nani Iro double gauze and I LOVE it! It has a wonderful drape and the double layers give it some body without making it a heavy fabric. I’ll definitely be using double gauze again for clothing.

Thimbleanna:  Nani Iro Shirt

I used a reeeeeeeally old pattern and changed it a little.  I’m not sure how it said to finish off the sleeves, but one of my favorite ways is to just bind them like you would bind a quilt.  3/4 length is my favorite.  And, even though I added a little to the length when I cut it out, I didn’t think it was long enough, so I added a bias band around the hemline.  It was an experiment and I’m really pleased with how it turned out.

Thimbleanna:  Nani Iro Shirt

So, Yay! I have a new top. Which will definitely cheer me up this week, ’cause I’ve been grumpy. We’re moving into little call-center-style cubicles at work and they’re awful. Really awful. No privacy at all. Stupid short walls and you can hear everything. Today was my first half-day in my cube and I could hear the guy an aisle-and-a-half away munching on carrots. It’s ok though, I’m just waiting for my turn to annoy people. See this guy?

Thimbleanna:   Flying Monkey

It’s a Flying Monkey. He screams as he flies through the air. The next time the goofballs at the other end of the room decide to have a gabfest, I’m going to launch him. I feel it’s my duty to contribute to the mayhem.  I’d like to think it might help the powers that be know what a stupid plan this is — but it won’t (they’re oblivious), so maybe we can laugh a little about it.  I’m armed and I’m not afraid to fire!

Have a great week — we should have a pool and guess how long I can hold out before I let the monkey fly LOL!
XOXO,
Anna

The Aunts’ Quilt — Month 8

Well Kids, it’s time for the monthly Aunts’ Quilt report — if you’re an Auntlet, I hope you’re caught up! If you’re behind, these summer months are slow and our assignments are a little lighter, so it’s a great time to catch up!

Our assignment for this month was the same as last month — 4 inset triangles. I cropped my triangles, just because the pictures were so awkward with all that triangle edge space in them. Then, after cropping, I put them all into one picture — you probably have better things to do than scroll through the four separate pictures.

Thimbleanna:  Aunts' Quilt

The applique this month was fun and easy. This little blue flower in the middle below, is by far my favorite flower. It might be because I love the fabric on the main part of the flower.

Thimbleanna:  Aunts' Quilt

Now, if you can believe it, my house-cleaning, weeding, trying-to-get-the-blocks-done-on-time self forgot to make the cookie of the month. The shock! The horror!!! I was just working too hard this weekend — that’s my excuse and I’m sticking to it. Not to worry though, because I DID pick out the cookie of the month and just because I didn’t get it made doesn’t mean that you can’t make them. This month, for your cookie-loving pleasure, I selected my blog-friend Jody’s famous Soft Molasses Cookies.  Here’s an older picture from one time when I made these cookies.

Thimbleanna:  Soft Molasses Cookies

Luckily, Jody shared her recipe with us years ago and I’ve been making them since then — they’re just the right combination of chewy and delicious and they’re wonderful!  These cookies sort of scream fall, or colder-weather cookies, but I think they’re amazing ALL year long — Yum, Yum!!!

Back to work Ladies — Month 9 on the Aunts’ Quilt is another light month — the last two inset triangles and then just two of the corners. Maybe you Auntlets can work ahead and be working on those border scallops — those border months are going to be a lot more work. Only one more month and then we’ll start putting the quilt top together — Yipee!

Also, if you follow me on Instagram, you know that Little Joys by Elea Lutz has arrived in my little Etsy shop. It’s an adorable holiday collection (ha! I didn’t say the C-word), in case you’re starting to think about a few holiday projects. I only have a few sets left, so don’t think too long!

Thimbleanna:  Little Joyos

Have a great week!
XOXO,
Anna

Not Five on Friday

Well, it’s Friday again — Yipee! And I don’t have five things for you — mostly because it’s been so slow around here, there just aren’t five things. There are barely three things!

We successfully made it through graduation season — the last of the little birds in our family will soon fly the coop and head off for college. We had a FULL weekend last weekend with parties and get-togethers and it was a lot of fun. I’ve been in a homebody funk the last few weeks and I wasn’t very excited about all of the activities, but MyDadLovesMeBestSister did a beautiful job and it was all so worth it. Aside from graduation, we had a nice little family dinner, a birthday brunch for CuteNiece1 and the weekend ended with a big multi-graduate-country-club bash, complete with candy bar and photo booth. It was jam-packed with lots of people and everyone had a great time!

Thimbleanna:  Photo Booth

I also managed to get CuteNiece2’s graduation quilt finished, just in the knick of time. Here it is, fresh out of the dryer, about an hour before I gave it to her.

Thimbleanna:  Grad Quilt

You’ve seen this quilt before. When I bought this fabric for my little shop a few years ago, it was always with the intention of making this quilt for my niece. She was definitely made for adventure, and now she’ll be off on her own grand adventure. I do love those sweet little adventure girls.

Thimbleanna:  Grad Quilt

(Ooooh, and have you see the new adventure boys that will be coming out this summer? They’re called The Adventurers and they’re SO cute!!!)

Now that the party is over, I’ve just been trying to get caught up around here — everything’s a mess. We’ve been busy trying to edge all the shrub/flower beds so that they can be mulched, but it’s taking so long, that we’ll have to re-weed the first few beds we edged. We’re hoping to finish that little task this weekend. In the meantime, I just ooh and ahh every time I see the Ugly Tree.

Thimbleanna:  Ugly Tree

In case you don’t remember, I don’t really think this is an ugly tree — I LOVE it, but TheManoftheHouse does not. It’s really a weeping cedar and I think it’s beautiful. Can you see that cool little sprout in the middle of the tree?  Here’s a close-up:

Thimbleanna:  Ugly Tree

It’s really hard to see with a two-dimensional picture — sorry. It’s like a new pine tree is growing out of the old one. It seems to have popped up almost over night! I would call this my favorite tree now, but every time I do that, my favorite tree dies, so I’m not going to say that about this one. But I Really, Really Love this tree!

Ok — that’s it for me. I’m off to take MeMum out to lunch so the cleaning ladies that she doesn’t have can clean her house. Have a great weekend!

XOXO,
Anna

Vinyl Project Bag

After I posted about my little vinyl project bag a few weeks ago, I had a few questions about how I make them, so I promised I’d post some details.

Before we get started though, a few disclaimers. I’ve been seeing these little bags pop up in a lot of places, so this is nothing new.  If you’ve been sewing for very long, you’ll easily be able to figure this out for yourself. There are lots of different (and probably better) ways to do the various steps — this is just how I do it, so if my methods don’t work for you, just remember that google is your friend. Especially where the zipper is concerned — there might be a method out there that works better for you.

So, in case you’ve forgotten, this is what we’re making (the bag, not the blocks). ;-D
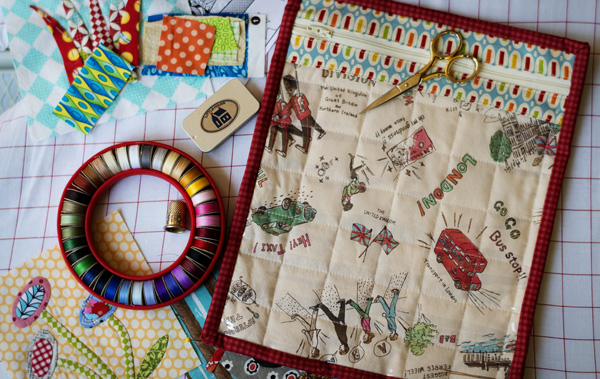
Thimbleanna:  Vinyl Project Bag

Here’s what you’ll need:

Thimbleanna:  Vinyl Project Bag

  • 2 – 10″ x 12″ pieces of fabric (the back of the bag)
  • 1 – 10″ x 12″ piece of batting (or flannel or soft and stable or whatever, depending on how firm you want the back of your bag)
  • 4 – 10″ x 1 1/2″ pieces of fabric (the prints on either side of the zipper)
  • 1 – 10″ x 10″ piece of vinyl
  • 1 zipper — longer than 10″ (I used 14″ because that’s what I had in my stash)
  • Approximately 55″ of 2 1/2″ wide binding folded in half and pressed

Cats are optional.

Thimbleanna:  Vinyl Project Bag

The first step is to prep the back.  Place one of the 10″ x 12″ squares of fabric, wrong side up, on your table.  Place the batting on top of it and then place the other piece of 10″ x 12″ right side up on top of the batting.  You’ve made a quilt sandwich that will be the back of the bag.  I like to quilt this sandwich and you can quilt it however you like — stippling, straight stitches, mattress style, etc.  I chose to quilt a grid, starting in the middle and then stitching a few lines on either side of the middle line.  In the picture below, you’ll notice map fabric behind the piece I’m quilting — I’m just quilting several back pieces at once.  If you’re going to make one vinyl bag, you might as well make several at once!

Thimbleanna:  Vinyl Project Bag

Now, take one of the 10″ x 1 1/2″ strips and turn one long edge under 1/4″ and press.  This step is optional, but I think it makes it easier later.  Then, take the zipper and sandwich one edge of it between the right sides of two of the 10″ x 1 1/2″ strips of fabric.  Pin or glue, whichever works for you.  And make sure that the piece with the pressed 1/4″ edge is on the back side of the zipper.

Thimbleanna:  Vinyl Project Bag

If you’re a zipperphobe, don’t quit now!  Take your little zipper sandwich to the machine and stitch a 1/4″  seam.  Be sure you have your zipper foot on your machine.  And you’ll notice that there are more pins in the zipper sandwich now that we’re stitching — my top fabric was slipping, so I added more pins.

Thimbleanna:  Vinyl Project Bag

Press the two pieces of fabric open — or so that they have their wrong sides together.

Thimbleanna:  Vinyl Project Bag

Repeat those steps on the other side of the zipper with the other 10″ x 1 1/2″ pieces of fabric.

Thimbleanna:  Vinyl Project Bag

Ta – Da!  Zipper in fabric!  ;-D  I forgot to take a picture of this next step, but, from the right side, top stitch close to the edge of the two seams that you just sewed.  (You can see the top stitching in future pictures.)  Reward yourself with some chocolate.  Preferably M&Ms from a crystal dish — a little elegance makes them taste better!

Thimbleanna:  Candy!

Now it’s time to sew the vinyl to the zipper piece.  With the zipper facing right side up, place the vinyl on top of the zipper piece with one edge of the vinyl along the unfinished edge of the fabric that is on top of the piece with the 1/4″ pressed edge.  That’s hard to explain — hopefully it made sense.  Now, flip the piece over and pin the fabric to the vinyl, being sure to keep your pins horizontal and close to the edge — the area that will be part of the seam.  If you pin farther away from the edge, you’ll be able to see holes in your vinyl after you sew the seam.  Take this fabric to your machine (regular foot or 1/4″ foot should be back on machine now) and sew a 1/4″ seam.

At this point, we need to discuss the vinyl.  It’s difficult to sew directly on vinyl because it’s sticky.  For this seam, the vinyl will be face down, against the feed dogs.  In order to keep things moving smoothly, I use scraps of tissue paper between the machine bed and the vinyl.  You stitch through the tissue paper just as if it were meant to be part of the bag.

Thimbleanna:  Vinyl Project Bag

After you’re done, peel the tissue paper off of both sides of the stitching line.

Thimbleanna:  Vinyl Project Bag

Then fold the vinyl seam toward the zipper and press on the right side of the fabric.  Two things to note here: a) ignore that ugly water stain on my little pressing board, and b) if you put that hot iron directly on your vinyl you’ll have a hot mess.  Haha — sorry for the pun.  But really, DO NOT put the hot iron directly onto the vinyl.  I just grab a fabric scrap or a flour sack towel or something to place between the vinyl and the iron.  Another thing you don’t want to do is leave the iron sitting there while you take a picture.  It won’t melt the vinyl, but it makes it a wee bit wrinkly.  ;-D

Thimbleanna:  Vinyl Project Bag

Ok, moving on.  Flip the zipper concoction so that the wrong side is up.  Here’s where having that 1/4″ seam folded over and pressed comes in handy.  You might have to adjust it a little, but place the folded edge up against the vinyl seam and pin.  I really wanted to glue here but I knew that the glue wouldn’t work on the vinyl.

Thimbleanna:  Vinyl Project Bag

Now … dang it!  I forgot another picture!  Anwway, flip the zipper concoction right side up and go to the machine and top stitch along that edge that you just pinned.  Your pins will be hidden under your piece, against the throat plate, so sew slowly and remove the pins as you go.

Now you’re ready to attach the front vinyl piece to the back piece that you quilted earlier.  Lay the vinyl piece, zipper right side up, on top of the quilted piece.  You may need to trim up the edges and then pin them in place.  And remember, if you’re going to pin along the vinyl, only pin very close to the edge, in the area that will eventually be part of a seam.

Thimbleanna:  Vinyl Project Bag

Now, it’s time to trim the zipper.  Be sure you’ve pinned securely on both sides of the zipper.  Take a deep breath and have some more M & Ms.  And ALERT!  Be sure your zipper pull has been pulled so that it’s on top of the quilted backing.  (If you leave the zipper pull out on either edge of the zipper, you’re going to have way more than a hot mess and you’re going to be saying a LOT of bad words.  I don’t know this from personal experience, but I have a vivid imagination.)  Cut the edges off of the zipper.  Rotary cutter or scissors, whatever works for you.

Thimbleanna:  Vinyl Project Bag

Now, bind your little bag, just like you would bind a quilt.  I’m not going to tell you how to do that part, there are a bajillion tutorials out there on the web.  I like to attach the binding by machine to the right side and then sew the binding to the back side by hand.  If you can make yours all by machine and have it look great then go for it!

Thimbleanna:  Vinyl Project Bag

And there you have it — finished vinyl zipper bags!  I love these little bags for hauling around my handwork.  Knitting too — next up, I’m going to make some bigger bags.  They keep all my work clean and tidy while it rambles around on the inside of my backpack.  (Oooh, and see how the edge where the vinyl meets the fabric attached to the zipper looks a little wobbly?  That’s because I stopped to take that vinyl-pressing picture a few steps back.  It’s hardly noticeable in real life, but just thought I’d point it out.  Also, can we just have a moment of silence to appreciate how those zigzags on the blue print on either side of the zipper lined up???  They’re a wee-bit off, but I couldn’t have planned that better if I’d tried!  I love a happy accident and I attribute it to the heavy consumption of M&Ms.)

Thimbleanna:  Vinyl Project Bag

One last thing — don’t forget to embellish your zipper pull — there are lots of fun things you can do with it!

Thimbleanna:  Vinyl Project Bag

Now, go forth and make Vinyl Project Bags.  And eat M&Ms.  It’s Fun!

Have a Wonderful Weekend!!!

XOXO,
Anna