Thimbleanna

Recipes

Chocolate Chip Cookie Wars

Gee Whiz. I guess I should write a post just to move those Happy Easter pictures into the past, huh? Not much going on around here to post about. It’s tax time you know. That means cleaning out files and wasting time looking for tax stuff. Yoyo production has slowed down as a result, but I’m gaining on the little devils. Yoyo Count: Yoyos: 290 Me: 578.

Thimbleanna: Chocolate Chip Cookies

In the meantime, how do you take your Chocolate Chip Cookies? Cake-y or Chewy? Regular or Jumbo? I’m not a huge Chocolate Chip Cookie fan (Oatmeal Raisin any day baby!), but I try to do my part to keep the Chocolate Chip Cookie lovers in the family happy. For years I’ve made a recipe that a friend gave me when the boys were in high school. She kept the sports teams happily supplied with after practice snacks. When she moved away I begged her to give me the recipe, you know, for the boys. She’s a sweetheart, and very kindly obliged. They’re tender and cake-y and almost everyone loves them.

Thimbleanna: Chocolate Chip Cookies

But, a few people prefer chewy Chocolate Chip Cookies and recently, I found a recipe that fit the chewy bill. Last time I made them, I made them regular size, but today, I made them jumbo sized. They’re a little more cakey in their jumbo form, but they’re still really good. (In other words, if you prefer them even more chewy, make the jumbo sized recipe, but scoop them into smaller cookies.)

In the event you’d like to experiment, here are the two Chocolate Chip Cookie recipes that we love. You’ll notice they’re almost the same recipe. A big difference in the cakey vs. chewy technique appears to be oven temperature.

Thimbleanna: Chocolate Chip Cookies

Regular Chocolate Chip Cookies

3 cups flour
1 teaspoon baking soda
1 teaspoon salt
1/2 pound (2 sticks) butter
3/4 cup granulated sugar
3/4 cup brown sugar
2 eggs
1 teaspoon vanilla extract
2 cups semisweet chocolate chips

Preheat oven to 375 degrees. Combine flour, baking soda and salt in a small bowl and set aside. Using an electric mixer, cream butter, sugars and vanilla together. Add eggs, one at a time. Add flour mixture to the butter mixture in thirds. Stir in chocolate chips.

Line 4 large baking sheets with parchment paper. Scoop the cookie dough onto cookie sheets. Bake until cookies start to brown, 8 – 10 minutes. Makes 24 cookies.

Thimbleanna: Chocolate Chip Cookies

Jumbo Chocolate Chip Cookies

1/2 pound (2 sticks) butter, softened
1 cup granulated sugar
3/4 cup brown sugar
2 eggs
1 1/4 teaspoons vanilla extract
3 cups all purpose flour
1 teaspoon baking soda
1 teaspoon salt
1 cup semisweet chocolate chips

Preheat oven to 325 degrees. In a large bowl, using an electric mixer, cream the butter, sugar and brown sugar until light and fluffy. Add the eggs and vanilla. Mix well and scrape the sides and bottom of the bowl. Sift together the flour, baking soda and salt. Mix into the creamed butter, scraping again. Stir in the chocolate chips.

Line 2 large baking sheets with parchment paper. Scoop the cookie dough into 12 large (1/3 cup) mounds. Bake until cookies are flat and very light golden brown 15 – 20 minutes. Makes 12 jumbo cookies.

And here’s another bonus to the Jumbo cookie recipe:

Thimbleanna: Chocolate Chip Cookies

It’s fun to stack them in the cookie jar!

XOXO,
Anna

Madeleines and Quilting

Happy Monday.  Ha.  Did you have a good weekend?  Mine was quiet — with a little baking and a lot of quilting.  Perfect.  When I made my first batch of madeleines years ago, I thought I’d found the perfect recipe.  Light and crispy on the outside and soft and tender on the inside.  Then, I promply lost that recipe.  In the years since then, I’ve searched through my cookbooks and elsewhere for a decent recipe, but they’re always tough and heavy like rocks.  (Sorry Martha, I didn’t like your Madeleines.)  Over the weekend, I decided to try the Madeleine recipe from the book Laduree: The Sweet Recipes.

Thimbleanna: Madelines

They were pretty darn perfect, crispy and light, just like I think they should be.  I know you’re probably thinking that I burned them.  And what are those funny humps?  Well, that’s how they’re supposed to look — see, here’s the picture from the Laduree book.  (I still might take them out a bit earlier next time though.)

Thimbleanna: Madelines

If you’d like to try them, you can find the recipe here .  They’re really best eaten the same day that they’re baked.  They still taste good today, but the crispness is gone from the exterior.  (Any tips or hints to keep them crispy on the outside?)

Hey, wanna see MeMum’s little teacup up close?  Isn’t it cute?

Thimbleanna: Madelines

I also machine quilted this weekend.  A Lot.  And my arms are sore to prove it.  I worked on the foundation quilt for all the yoyos.  I finally got up enough nerve to try it and the quilting went well.  Look Ma, no walking foot!

Thimbleanna:  Machine Quilting

I do love my little Hester. Viking has an even feed feature on some of their machines (maybe all of them for all I know) and it makes quilting SO much easier. More on the yo-yo quilt in the days to come. The machine quilting is done, but she’s still a long way from being finished!

XOXO,
Anna

Happy New Year!

Happy New Year!

New Year Kitties

And thus endeth the Holiday Triad (Thanksgiving, Christmas, and New Years) that keeps us busy morning, noon and night. Are you all recovering from all of your wild partying??? We’ve had a fun and busy week. Capped off by our annual New Year’s Day family dinner. It’s the kids’ favorite meal of the year. Our menu is always the same:

Awesome Standing Rib Roast
(really, I see all kinds of standing rib roast recipes that look so fussy involving meat thermometers, etc. — you should try this recipe — it’s SO easy and always turns out perfectly!)
Twice Baked Potatoes
Carrot Puff
Green Beans Almondine
Overnight Seven-Layer Salad
Perfect Dinner Rolls (Thanks JuniePeep for telling me about this fantastic recipe)
Creme Brulee (MyDadLovesMeBestSister’s Specialty!)

Yum Yum! It was fabulous and today we’re all stuffed.

I was looking through my recipes and realized that I haven’t ever posted the Seven-Layer Salad in my archives.  The boys’ LOVE this salad and I love it too ’cause you make it the day before, so the day-of meal preparation is just that much easier.

SevenLayerSalad

Overnight Seven-Layer Salad

1 medium head iceberg lettuce, washed and chilled
1 bunch green onions
1 8-oz. can water chestnuts
1/2 red or green bell pepper, seeded
2 stalks celery
1 10-oz. package frozen peas
2 cups mayonnaise
2 teaspoons sugar
1/2 cup grated Parmesan cheese
1 teaspoon salt
1/4 teaspoon garlic powder
3/4 lb. bacon, crisp fried and drained
3 hard-cooked eggs
2 tomatoes

Core and chop lettuce into thin slivers. Spread lettuce over bottom of a wide 4-qt. serving dish. With a knife, thinly slice green onions and part of the tops. Scatter slices over the lettuce.

Drain water chestnuts and slice. Sprinkle over onions. Chop bell pepper and sprinkle over water chestnuts. Chop celery and sprinkle over bell pepper. Break apart frozen peas and spread over celery. Spread mayonnaise evenly over peas. Sprinkle with sugar, Parmesan cheese, salt and garlic powder.

Finely chop bacon and sprinkle over salad. Coarsely chop eggs and sprinkle over the bacon. Cover and chill for 4 hours or as long as 24 hours. Just before serving, cut tomatoes in wedges and arrange around top of salad. To serve, use a spoon and fork to lift out each serving, which should include some of each layer.

SevenLayerSalad

And, now we’re off and running! A New Year. A Clean Slate. Happy, Healthy New Year Wishes to all of you — I hope your year will be full of joy and fun! (That means lots of sewing and knitting and making LOL!)
XOXO,
Anna

I Scream, You Scream…

Wait! Before we talk about Ice Cream — I’ve been terribly remiss in my Aurifil Block of the Month duties. Miss June is none other that Pam Kitty Morning! I’m so sorry it’s taken me so long to mention your adorable block PKM — in my defense, I’ve been a little distracted with daughter duties this month. BUT — I LOVE the June block — How cute is this???

PKM Block

I think PKM might be putting this cute basket on a little hand towel — and now I have a hand towel on my to-do list.  I love all the vintage-y goodness about this cute little basket of flowers.  Very Fun!

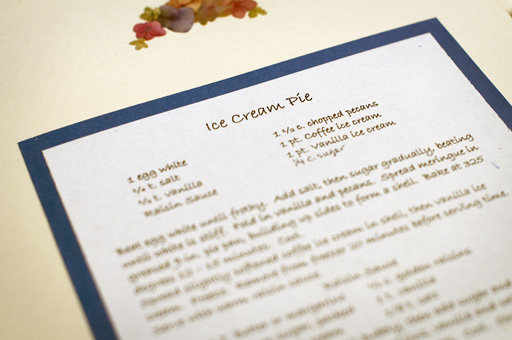
Now, back to ice cream.  Is is hot where you are?  It’s been pretty steamy (and DRY — send RAIN!) here in the middle parts of the US.  Perfect for some ice cream pie.  This is an old family favorite that we put into our family cookbook a few years ago.  

Ice Cream Pie

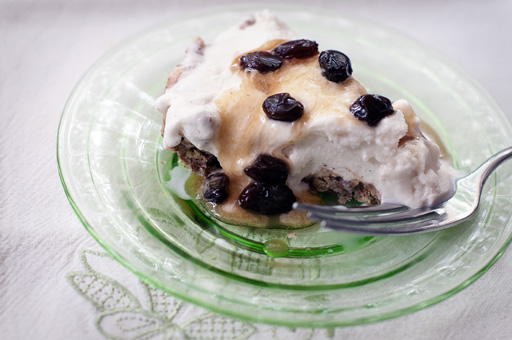
MyDadLovesMeBestSister used to request this pie in lieu of birthday cake every year.  I love it for the nut crust which is awesome.  And the sauce.  I know lots of people don’t like raisins, and they can easily be left out of this recipe.  I LOVE raisins though, so they stay in for me.  This piece of ice cream pie is looking all melty, but it’s still good.  You have to eat it pretty quickly in this heat if you don’t want a big yummy puddle.

Ice Cream Pie

Ice Cream Pie

1 egg white
1 1/2 cups chopped pecans
1/4 teaspoon salt
1/4 cup sugar
1/2 teaspoon vanilla
1 pt. coffee ice cream (I hate coffee anything, so I substitute Maple Pecan Ice Cream)
1 pt. vanilla ice cream
Raisin Sauce

Beat egg white until frothy. Add salt, then sugar gradually, beating until egg white is stiff. Fold in vanilla and pecans. Spread meringue in greased 9-inch pie pan, building up sides to form a shell. Bake at 325 degrees, 12-15 minutes. Cool.
Spread slightly sofened coffee ice cream in shell, then vanilla ice cream. Freeze. Remove from freezer 20 minutes before serving time. Serve with warm raisin sauce.

Raisin Sauce

3 tablespoons butter
1 cup brown sugar, packed
3/4 cup whipping cream
1/2 cup raisins
1 teaspoon vanilla
1/8 teaspoon salt
Heat butter in saucepan until bubbly, then add sugar and cream, stirring until well blended. Add raisins, vanilla and salt and slowly bring sauce to a boil. Cook about 5 minutes. Cool. Spoon sauce over each pie serving.

Enjoy! It’s a fun, decadent treat for a hot summer day!
XOXO,
Anna

A Tale of Two Cakes

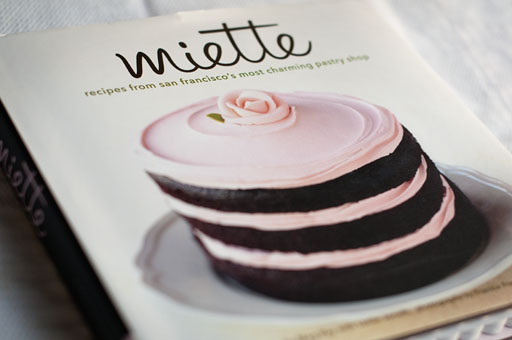
Every year for Christmas, my in-laws give me an Amazon Gift Certificate.  I finally ordered my books a few weeks ago, and among them was Miette – Recipes from San Francisco’s Most Charming Pastry Shop.  Part of the reason it took me so long to cash in my gift certificate was because I had a hard time deciding on this book.  It had mixed reviews — mostly due to mistakes that went to press with the first two editions.  But really, how could I pass up a cookbook with such an adorable little cake on the front cover?

Scavenger Hunt

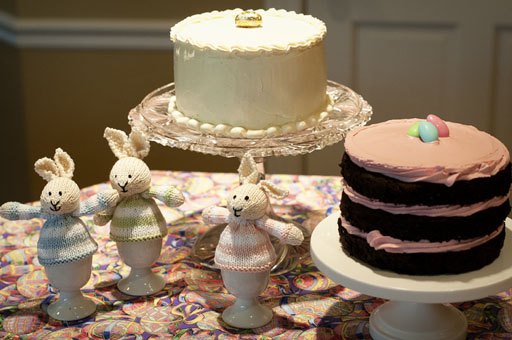
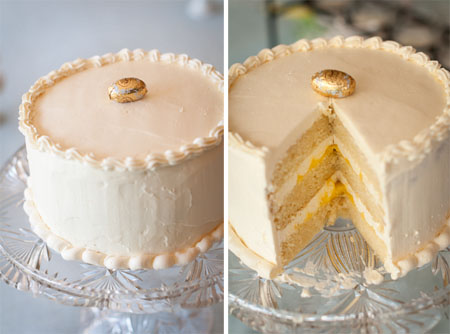
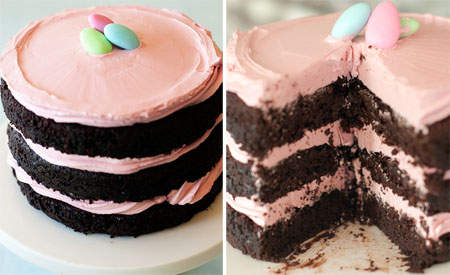
After pouring through the book, I decided to try a few of the recipes for our Easter dinner.  These are small cakes — only 6″, so I reasoned we’d need two cakes for our family.  I decided on the Lemon Debutante Cake and the Tomboy Cake (aka, the cake on the cover.)  (Don’t they look cute with my Little Cotton Rabbits?)

Scavenger Hunt

Oh.Emmm.Geeee.  These cakes were SO fun to make and they were really good.  They’re not for the faint of baking heart however — they’re very labor intensive.  But Oh. So. Worth the effort.  In case you love to bake like I do (Hi Linda NoBlog and Brigette!), or if you’ve landed here looking for info on these cakes (the internet was really helpful to me with info about these cakes), I thought I’d share a few observations.

Scavenger Hunt

  • When I went to buy the 6″ cake pans, instead of buying 2 – 6″ x 3″ pans, I bought 3 – 6″ x 2″ pans.  Each recipe makes 2, 3″ high cakes and then you split each 3″ cake into 3 sections.  Since I had three pans, I decided it should work to make three of them and split each in half, still having 6 layers in the end.  One of the biggest complaints on the internet about these recipes is that they sunk in the middle.  Both of my cakes also sunk a little, but I’m sure it wasn’t as bad as if I’d been using the 3″ pans.  The white (lemon) cake didn’t rise nearly as high either, so I didn’t really end up with a second set of three layers, which was fine.  Either way, I think I’ll stick with making the layers in the shorter pans.
  • I heard that someone on cupcake wars tried to make the European buttercream frosting and ran out of time. No Kidding! I’m thinking they should have been disqualified for even trying it. It is very time consuming and patience is the key. The recipe said to add the boiling sugar water slowly to the meringue and then whip at high speed for about 10 minutes while the mixture cooled down. The whole time, I was thinking “How is this going to cool down? Whipping creates friction, right?” After 10 minutes, it definitely wasn’t cool enough to add the butter, so I turned the mixer off and just let it set for 20 minutes. Then you add the butter 1 Tbsp. at a time. Patience.  If you rush it, your buttercream will be ruined. The recipe was surprisingly easy, if you just follow the instructions — and your instinct!
  • The pink frosting in the Tomboy Cake is actually raspberry flavored.  (And boy, is it ever good.  When you take a bite of the cake, you taste the deep, rich chocolate first, and then the raspberry hits you.  Yummmo!)  You have to boil raspberries to get some raspberry juice to add to the frosting. While my juice was cooling, my arm accidentally caught the sieve and the juice flew everywhere. Try not to be such a klutz like me!
  • Our local cake shop is a great resource for the 6″ cake pans. Much more reasonable than amazon.
  • These cakes may be small, but they’re rich. One cake would probably serve 12 people and would have been plenty for the 9 of us.

Scavenger Hunt

So, this little cookbook is a BIG hit with me! The recipes are very detailed, with lots of tips to help you be successful. Plus, they’re delicious. I took the leftovers to work on Monday morning and everyone loved them.  If you decide to get the book, be sure and get the errata sheet — one of the errors is in the buttercream recipe.

Off to pack my gym bag for tomorrow — I need to make a feeble attempt at working off that buttercream!
XOXO,
Anna