Thimbleanna

Seeing Stars

I thought I’d pop in for a minute and take a yoyo break.  I’ve been yoyo obsessed and I’m spending almost all not-at-work moments sewing those darn yoyos to their quilt.  The Count?  Yoyos: 688, Me: 180.  I’m getting there!  Progress will probably slow down as the project drags on though — you probably know how that goes.

Before I started sewing the yoyos down, I managed to make a few more of the pieced stars that I started making a few months ago.  This is a project that will reeeeally be slow, but that’s ok, I’m enjoying the process.  I also had two happy discoveries that will make this project more fun.

Thimbleanna: Pieced Stars

I wasn’t terribly happy with my joining stitches and I remembered that MeMum always used silk thread when she was stitching applique blocks.  I decided to order a few spools and it makes all the difference.  The silk thread is so fine, it gets partially buried into the fabric.  Yay for less visible stitches!

Thimbleanna: Pieced Stars

I also realized that one little charm square will give me 3 or 4 diamond pieces.  A charm pack has 42 different prints, so that means that two charm square packs will make 42 different stars.  That’s perfect for my scrappy stars.  My Avalon and Glamping charm packs arrived with perfect timing!

Thimbleanna: Pieced Stars

I probably should be trying to come up with a plan or a color scheme for these stars. Maybe I can think about it while I’m sewing down yoyos LOL!

I hope you’re having a good week!
XOXO,
Anna

Happy Friday!

Hello Invisible Peeps!  Just popping in for a quick check-in.  It’s been a busy, not-productive-crafty-wise week here.  I had a trip for work, earlier in the week.  I flew home from Washington/Reagan on Wednesday afternoon (you know, the day when the snowquester was supposed to hit).  Check out this picture of the airplane departure board that I posted on Instagram:

Thimbleanna: On Time

How lucky was that?  My flight was one of the very few in the whole airport that wasn’t cancelled.  I felt like I should run out and buy a lottery ticket.  And to add to my luck, look what I found when I got home!  SNOW!!!!

Thimbleanna: Snow

Finally!  We’ve had such a snow-worthless winter this year.  I guess it’s better late than never.  I took this picture early this morning just as the sun was coming up.  It’s my Friday off, but I ran into work for a 5:30 a.m. workout with this awesome trainer that we have in our teeny-tiny fitness center.  Only two of us showed up that early but it was SO worth not sleeping in.  Especially when you consider that I stopped at Starbucks on the way home and undid all the calories I burned.  YayMe!!!

Thimbleanna: YoYo Quilt

So, now, I’m going to work on the yoyos for a little while this morning and watch and old movie or two.  I’ve sewn a few yoyos down this week.  Yoyos: 824, Me: 44.  At this rate, I’ll be done by 2019!  (Oh, and in the interest of full disclosure, you’ll notice a few pins in there.  I’m thinking I might stop using the basting gun to hold the yoyos to the quilt — I’m worried that it’s going to make holes in the quilt back.)

Have a great weekend!
XOXO,
Anna

Yo-Yo-ing Along

WooHoo!  I finished quilting (and binding!) the yoyo quilt.  Too bad it only looks like this:

Thimbleanna: YoYo Quilt

I’m so happy to finally have the quilting finished.  I’d put it off for so long because I was afraid of that big grid in the middle.  I thought it would be too easy to get it skewed into some odd shape.  I’m sure the rows aren’t perfect, but the overall shape is good and I think it will be fine.   I love the way the quilting looks on the back too.

Thimbleanna: YoYo Quilt

So, now the fun of laying out the yoyos begins.  This will be hard for me — I can overthink these things and be pretty indecisive.  I decided the easiest way would be to throw all the yoyos into the air and see if they would sort themselves out.

Thimbleanna: YoYo Quilt

That didn’t work (although PaulKitty thought it was a fun game) so I’ve sorted the yoyos into bowls by print.

Thimbleanna: YoYo Quilt

Now I’m shuffling and arranging.  And then, I’ll sew each yoyo (868 of them) onto the background by hand. There are many different ways that this quilt could have been done.  I could have sewn each yoyo onto it’s own little square by machine (which would have been faster than by hand) and then pieced those squares together.  But I couldn’t see quilting the quilt with all the yoyos on there.  Much too bulky for my little domestic machine.  And I can’t see machine stitching each yoyo on either — too much turning of the quilt with all that bulk.  So, hand sewing it is. There’s still a. lot. of work left in this quilt.  But I’m starting to see the light at the end of the tunnel now.

Thimbleanna: YoYo Quilt

And the good thing is that I’ve finally found a use for that dumb basting gun that MeMum and I bought years ago.  We hated it for basting, but I think it will come in handy to hold the yoyos in place while I’m hand stitching them down.  The other option was to pin the yoyos down, but I could only see that ending with me being stabbed a lot by all those pins.

Thimbleanna: YoYo Quilt

I’m off to go play some more with the yoyos now.  I hope you’re having a good weekend!

XOXO,
Anna


Madeleines and Quilting

Happy Monday.  Ha.  Did you have a good weekend?  Mine was quiet — with a little baking and a lot of quilting.  Perfect.  When I made my first batch of madeleines years ago, I thought I’d found the perfect recipe.  Light and crispy on the outside and soft and tender on the inside.  Then, I promply lost that recipe.  In the years since then, I’ve searched through my cookbooks and elsewhere for a decent recipe, but they’re always tough and heavy like rocks.  (Sorry Martha, I didn’t like your Madeleines.)  Over the weekend, I decided to try the Madeleine recipe from the book Laduree: The Sweet Recipes.

Thimbleanna: Madelines

They were pretty darn perfect, crispy and light, just like I think they should be.  I know you’re probably thinking that I burned them.  And what are those funny humps?  Well, that’s how they’re supposed to look — see, here’s the picture from the Laduree book.  (I still might take them out a bit earlier next time though.)

Thimbleanna: Madelines

If you’d like to try them, you can find the recipe here .  They’re really best eaten the same day that they’re baked.  They still taste good today, but the crispness is gone from the exterior.  (Any tips or hints to keep them crispy on the outside?)

Hey, wanna see MeMum’s little teacup up close?  Isn’t it cute?

Thimbleanna: Madelines

I also machine quilted this weekend.  A Lot.  And my arms are sore to prove it.  I worked on the foundation quilt for all the yoyos.  I finally got up enough nerve to try it and the quilting went well.  Look Ma, no walking foot!

Thimbleanna:  Machine Quilting

I do love my little Hester. Viking has an even feed feature on some of their machines (maybe all of them for all I know) and it makes quilting SO much easier. More on the yo-yo quilt in the days to come. The machine quilting is done, but she’s still a long way from being finished!

XOXO,
Anna

Darn It!

Darn it — my sock got a hole in it, so I had to darn it.

{Sorry, you may groan now.}

After 7 or 8 years of knitting socks they’ve finally started to get holes in them. I don’t waste my time darning store-bought socks because they’re so inexpensive to replace, but hand-knit socks are expensive and take a lot of time to knit — therefore well worth the five minutes it takes to fix them.

So, while I was fixing the hole, I thought I’d show you how I do it. I can’t even remember how I learned how to darn socks and I’m by no means an expert. I don’t even know if it’s the right way, but it works for me.

Thimbleanna: Sock Darning

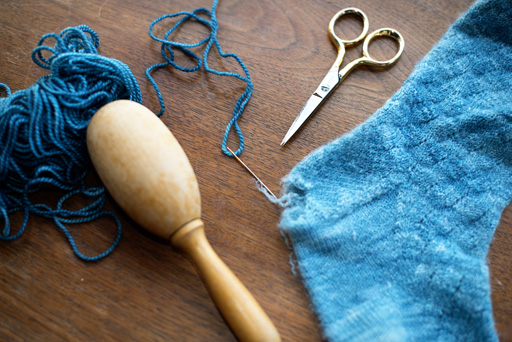
You need a sock with a hole, matching yarn (or not, your preference), a needle, scissors, and a darning egg. (You can use a lightbulb. Make that an incandescent lightbulb — those goofy corkscrew lightbulbs probably won’t work.)

Thimbleanna: Sock Darning

I thread the needle with a reeeeeeeally long piece of yarn and then I stitch a circle around the outside of the hole. Can you see it in picture below? I don’t knot the end of the yarn — I leave a tail hanging out to weave in later.

Thimbleanna: Sock Darning

Then I stitch fairly close parallel lines back and forth until I’ve gone all the way across the circle.  I make sure that each line starts and ends outside of the original circle that I stitched.   My lines aren’t neat and tidy but I’m not entering them in a contest, so I don’t care.

Thimbleanna: Sock Darning

After the base threads are laid down, I start at one end and weave perpendicular lines.  Over and under every other stitch, just like we did with our little weaving projects in elementary school.  When I have the needle all the way across for each line, I squish a little on the lines that have already been woven.  This helps to pack the yarn in a little.

Thimbleanna: Sock Darning

When the circle is filled in, I weave in the ends of the yarn.  Then I go back and weave in the tail that was left when I started weaving.  There’s nothing attractive about my little patch, but it will extend the life of my socks for a little while longer.

Thimbleanna: Sock Darning

If you want more info about darning, a quick google search will turn up lots of resources. There are even different patterns that you can follow so that your patch will look much prettier than mine!

Happy Darning!
XOXO,
Anna